The Windsor knot, a symbol of sophistication and refined taste, stands as one of the most iconic and widely recognized necktie knots in the world. Its symmetrical, triangular shape exudes confidence and professionalism, making it a staple for gentlemen across various industries and social settings. Unlike simpler knots like the Four-in-Hand, the Windsor knot boasts a fuller, more substantial appearance, reflecting a commitment to detail and a polished personal style. But beyond its aesthetic appeal, mastering the Windsor knot offers practical advantages. It fills the collar space more completely, creating a balanced and harmonious look, especially with spread or cutaway collar shirts. This is particularly important in formal environments where a meticulous appearance is paramount. Learning to tie a Windsor knot can elevate your overall presentation, signaling attention to detail and a respect for sartorial tradition.
In today’s fast-paced world, where first impressions matter more than ever, mastering essential skills like tying a proper Windsor knot can provide a subtle yet significant edge. Whether you’re navigating a crucial business meeting, attending a formal gala, or simply aiming to enhance your everyday style, the Windsor knot offers a timeless solution. It’s a skill that transcends fleeting trends, remaining relevant across generations. Furthermore, understanding the nuances of different tie knots, including the Windsor, empowers you to make informed choices about your attire, aligning your knot with the specific collar style and occasion. This level of sartorial awareness demonstrates a refined understanding of etiquette and a commitment to presenting your best self. In a world saturated with fleeting fashion trends, the Windsor knot remains a beacon of enduring elegance.

While the Windsor knot might initially seem daunting to learn, with practice and a clear understanding of the steps involved, it becomes a relatively simple and rewarding skill to acquire. This guide aims to demystify the process, providing a comprehensive and easy-to-follow tutorial on how to tie a perfect Windsor knot every time. We will delve into the step-by-step instructions, offering visual aids and practical tips to ensure success. By the end of this guide, you will not only be able to confidently tie a Windsor knot but also understand the underlying principles that contribute to its distinctive shape and appeal. Prepare to unlock a new level of sartorial sophistication and elevate your personal style with the timeless elegance of the Windsor knot.
This guide will cover not only the standard full Windsor knot but also touch upon variations like the Half Windsor, offering a more versatile approach for different tie fabrics and collar styles. We will also address common mistakes and troubleshooting tips to help you overcome any challenges you might encounter along the way. Whether you are a seasoned tie wearer or a complete beginner, this guide is designed to provide you with the knowledge and skills necessary to master the art of the Windsor knot and confidently showcase your refined personal style. So, grab your favorite tie and let’s embark on this journey to sartorial excellence.
The Anatomy of a Perfect Windsor Knot
The Windsor knot, often associated with the Duke of Windsor, is a symmetrical and triangular tie knot favored for its substantial appearance and ability to fill a wide collar space. However, contrary to popular belief, the Duke of Windsor himself did not invent the knot. He simply preferred a wider knot and achieved it by having his ties made from thicker fabric. Despite its origins, the Windsor knot has become synonymous with elegance and formality, making it a popular choice for business professionals, special occasions, and anyone seeking a polished and sophisticated look. Understanding the key elements that contribute to a perfect Windsor knot is crucial for achieving the desired result. These elements include proper tie length, collar compatibility, and precise execution of each step in the tying process. A well-tied Windsor knot should sit snugly against the collar, with the tip of the tie reaching the belt buckle.
Essential Prerequisites for Tying a Windsor Knot
Before diving into the step-by-step instructions, it’s essential to ensure you have the right tools and setup. This includes selecting the appropriate tie and shirt collar combination. The Windsor knot works best with ties made from thinner to medium-weight fabrics, as its multiple wraps can create excessive bulk with thicker materials. As for shirt collars, spread collars, cutaway collars, and wide-spread collars are ideal choices, as they provide ample space for the knot to sit comfortably and symmetrically. The tie length is also a critical factor. Taller individuals may require longer ties to achieve the proper length after tying the Windsor knot. To begin, stand in front of a mirror and ensure your shirt is buttoned up to the top. Position the tie around your neck, with the wide end extending significantly lower than the narrow end. The exact difference in length will depend on your height and the thickness of your tie, but a good starting point is to have the wide end extending about 12 inches lower than the narrow end.
- Tie Fabric: Opt for thinner to medium-weight fabrics.
- Collar Style: Choose spread, cutaway, or wide-spread collars.
- Tie Length: Adjust the wide end based on your height and tie thickness.
- Mirror: Use a mirror to ensure proper alignment and symmetry.
Step-by-Step Guide to Tying a Windsor Knot
Now that you’ve prepared the necessary elements, let’s proceed with the step-by-step instructions for tying a perfect Windsor knot. Follow these steps carefully and practice regularly to master the technique.
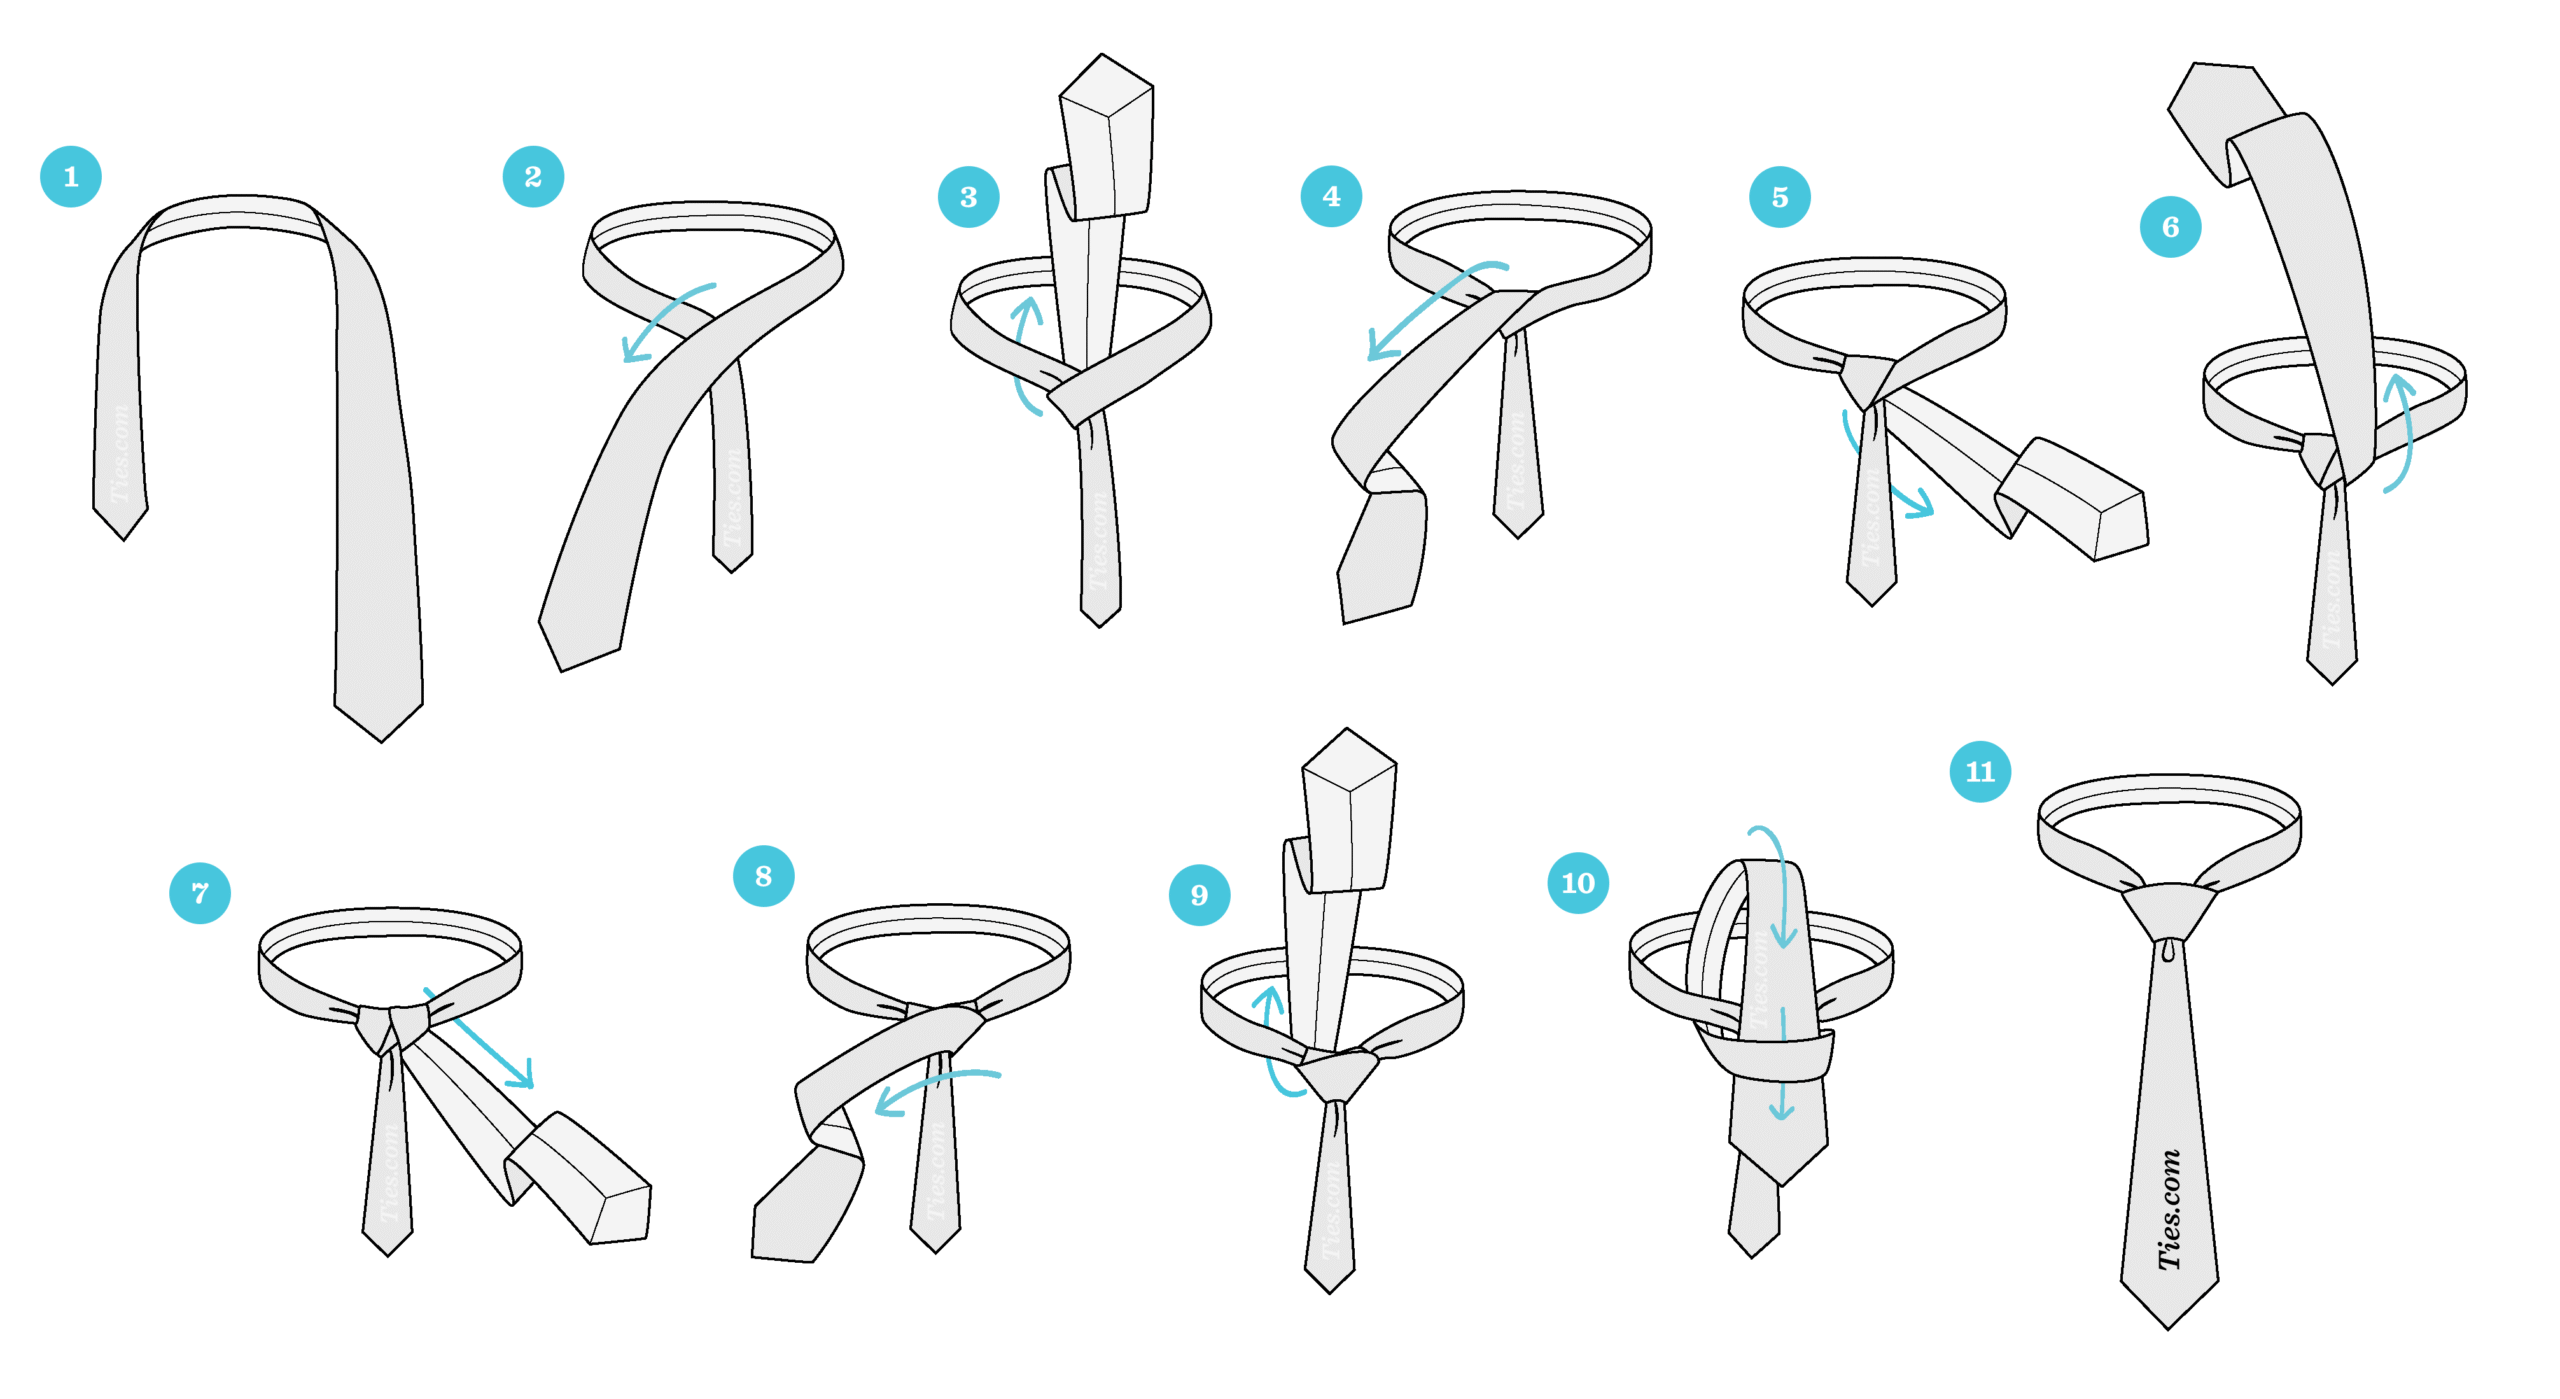
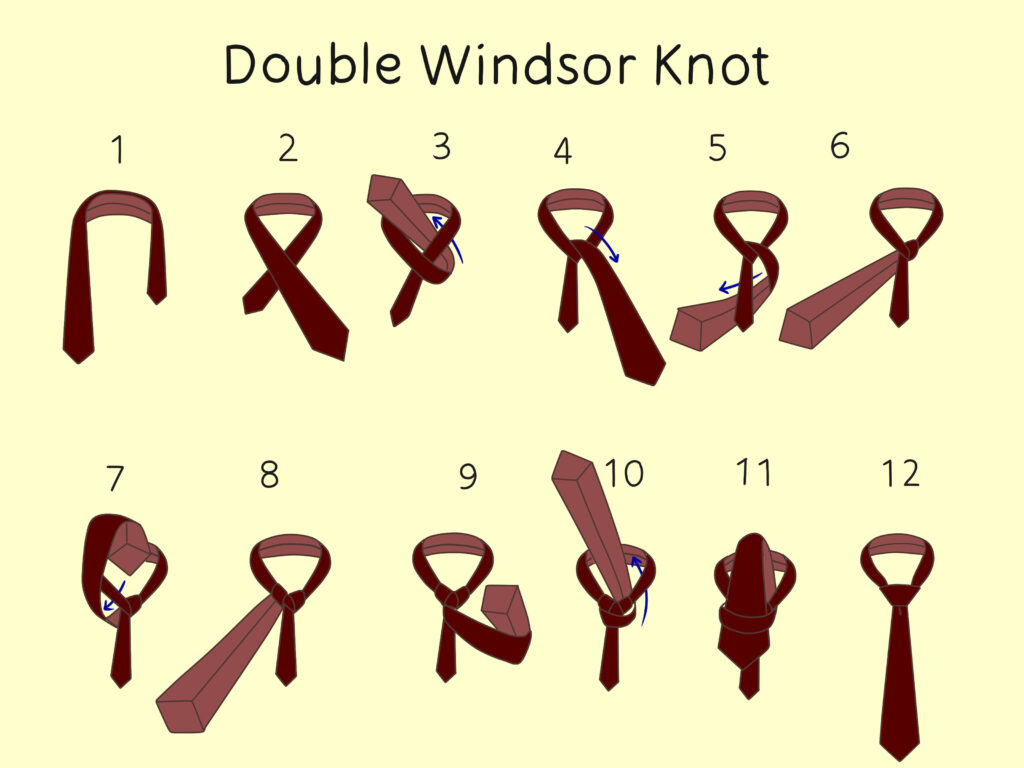
- Start with the Wide End Longer: As mentioned earlier, position the tie around your neck with the wide end extending significantly lower than the narrow end.
- Cross the Wide End Over the Narrow End: Bring the wide end across the narrow end, forming an “X” shape just below your chin.
- Bring the Wide End Up and Behind the Loop: Pass the wide end up and behind the loop around your neck, emerging on the opposite side.
- Bring the Wide End Down and Over the Front: Bring the wide end down and over the front of the knot, creating a horizontal band.
- Bring the Wide End Up and Behind the Loop Again: Pass the wide end up and behind the loop around your neck once more, emerging on the same side as before.
- Bring the Wide End Down Through the Knot: Bring the wide end down through the loop you’ve just created in the front of the knot.
- Adjust and Tighten: Hold the narrow end and slide the knot up to your collar, tightening it gradually. Ensure the knot is symmetrical and sits snugly against your collar.
- Fine-Tune the Dimple: Create a dimple just below the knot by gently pinching the tie in the center. This adds a touch of elegance and visual interest.
Common Mistakes to Avoid
While the Windsor knot is relatively straightforward, several common mistakes can detract from its appearance. One common error is making the knot too tight or too loose. A knot that is too tight will be uncomfortable and restrict movement, while a knot that is too loose will look sloppy and unprofessional. Another mistake is failing to center the knot properly. Ensure the knot is positioned directly in the center of your collar for a balanced and symmetrical look. Finally, neglecting to create a dimple can leave the knot looking flat and lifeless. Remember to gently pinch the tie in the center to create a subtle dimple, adding depth and character to the knot. Practice and attention to detail are key to avoiding these common mistakes and achieving a flawless Windsor knot.
Variations and Advanced Techniques
While the full Windsor knot offers a classic and sophisticated look, exploring variations and advanced techniques can further enhance your tie-tying skills and allow you to adapt the knot to different styles and occasions. The Half Windsor knot, for example, provides a slightly smaller and less bulky alternative, making it suitable for thinner ties and narrower collar styles. Mastering these variations expands your sartorial repertoire and allows you to express your personal style with greater confidence. Furthermore, understanding advanced techniques, such as creating a deeper dimple or adjusting the knot for different tie fabrics, can elevate your tie-tying game to the next level.
The Half Windsor Knot: A More Versatile Alternative
The Half Windsor knot, as the name suggests, is a smaller and less symmetrical version of the full Windsor knot. It requires fewer wraps and produces a more triangular shape, making it a versatile option for a wider range of tie fabrics and collar styles. The Half Windsor is particularly well-suited for thinner ties, as it avoids the excessive bulk that can result from tying a full Windsor with a lightweight material. It also works well with point collars and button-down collars, which may not have enough space to accommodate the larger full Windsor knot. The tying process for the Half Windsor is similar to the full Windsor, but with a few key differences. By omitting one of the wraps around the neck, you create a smaller and less symmetrical knot that is both elegant and easy to tie.
- Start with the Wide End Longer: As with the full Windsor, begin with the wide end extending significantly lower than the narrow end.
- Cross the Wide End Over the Narrow End: Bring the wide end across the narrow end, forming an “X” shape just below your chin.
- Bring the Wide End Up and Behind the Loop: Pass the wide end up and behind the loop around your neck, emerging on the opposite side.
- Bring the Wide End Down Through the Knot: Bring the wide end down through the loop you’ve just created in the front of the knot.
- Adjust and Tighten: Hold the narrow end and slide the knot up to your collar, tightening it gradually. Ensure the knot is symmetrical and sits snugly against your collar.
- Fine-Tune the Dimple: Create a dimple just below the knot by gently pinching the tie in the center.
Adapting the Windsor Knot for Different Tie Fabrics
The type of fabric your tie is made from can significantly impact the appearance of your Windsor knot. Thicker fabrics, such as wool or cashmere, tend to create larger and bulkier knots, while thinner fabrics, such as silk or linen, produce smaller and more streamlined knots. To adapt the Windsor knot for different tie fabrics, you may need to adjust the starting length of the wide end and the tightness of the knot. With thicker fabrics, start with the wide end slightly shorter to avoid creating an excessively large knot. With thinner fabrics, start with the wide end slightly longer to ensure the knot has enough substance and fills the collar space adequately. Experiment with different tie fabrics and adjust your technique accordingly to achieve the perfect Windsor knot every time. Understanding these nuances allows you to tailor your tie-tying technique to the specific characteristics of each tie fabric.
Advanced Techniques: Creating a Deeper Dimple
The dimple, a subtle indentation just below the knot, is a hallmark of a well-tied tie. It adds depth, texture, and visual interest to the knot, elevating your overall appearance. Creating a deeper dimple requires a bit of practice and finesse, but the results are well worth the effort. To create a deeper dimple, gently pinch the tie in the center just below the knot, using your thumb and forefinger to create a distinct crease. Hold the dimple in place as you tighten the knot, ensuring the crease remains intact. You can also use a dimple clip, a small metal or plastic device that helps to hold the dimple in place while you tie the knot. Experiment with different techniques and find the one that works best for you. A well-defined dimple can transform an ordinary tie knot into a statement of style and sophistication. Mastering the art of the dimple is a key element in achieving a truly exceptional Windsor knot.
Case Study: The Windsor Knot in Business and Formal Settings
The Windsor knot has long been a favorite among business professionals and those attending formal events. Its symmetrical and substantial appearance exudes confidence and authority, making it an ideal choice for important meetings, presentations, and networking events. In the corporate world, the Windsor knot is often seen as a symbol of professionalism and attention to detail. It conveys a sense of competence and trustworthiness, which can be invaluable in building relationships and closing deals. At formal events, such as weddings, galas, and black-tie affairs, the Windsor knot adds a touch of elegance and sophistication to any ensemble. It complements a well-tailored suit or tuxedo, creating a polished and refined look that is sure to impress. The Windsor knot’s versatility and timeless appeal make it a staple in the wardrobes of discerning gentlemen around the world. Its continued popularity is a testament to its enduring style and its ability to elevate any outfit.
Summary and Recap
In this comprehensive guide, we have explored the art of tying a Windsor knot, delving into its history, anatomy, variations, and advanced techniques. The Windsor knot, a symbol of sophistication and refined taste, remains a timeless classic in the world of men’s fashion. Its symmetrical and triangular shape exudes confidence and professionalism, making it a popular choice for business professionals, special occasions, and anyone seeking a polished and elegant look. Mastering the Windsor knot requires a combination of knowledge, practice, and attention to detail. By following the step-by-step instructions outlined in this guide, you can confidently tie a perfect Windsor knot every time, elevating your personal style and making a lasting impression.
We began by discussing the essential prerequisites for tying a Windsor knot, including selecting the appropriate tie fabric and shirt collar combination. We emphasized the importance of choosing thinner to medium-weight fabrics and spread or cutaway collars to achieve the desired shape and symmetry. We then provided a detailed step-by-step guide to tying the full Windsor knot, highlighting common mistakes to avoid and offering practical tips for achieving a flawless result. We also explored the Half Windsor knot, a more versatile alternative that is well-suited for thinner ties and narrower collar styles. Understanding these variations allows you to adapt the Windsor knot to different styles and occasions.
Furthermore, we discussed advanced techniques, such as adapting the Windsor knot for different tie fabrics and creating a deeper dimple. These techniques can further enhance your tie-tying skills and allow you to express your personal style with greater confidence. We also examined a case study highlighting the Windsor knot’s popularity in business and formal settings, emphasizing its ability to convey professionalism, authority, and sophistication. In conclusion, the Windsor knot is a valuable skill to acquire for any gentleman seeking to enhance his personal style and make a lasting impression. With practice and dedication, you can master the art of the Windsor knot and confidently showcase your refined taste.
- Key Takeaway 1: The Windsor knot is a symmetrical and triangular tie knot favored for its substantial appearance.
- Key Takeaway 2: The Half Windsor knot is a smaller and more versatile alternative to the full Windsor.
- Key Takeaway 3: Adapting the Windsor knot for different tie fabrics is crucial for achieving the perfect look.
- Key Takeaway 4: Creating a deeper dimple adds depth and visual interest to the knot.
- Key Takeaway 5: The Windsor knot is a symbol of professionalism and sophistication in business and formal settings.
Frequently Asked Questions (FAQs)
What is the difference between a Windsor knot and a Half Windsor knot?
The Windsor knot is a larger, more symmetrical knot that requires more fabric to tie. It is best suited for spread or cutaway collars and thicker ties. The Half Windsor knot is a smaller, less symmetrical knot that requires less fabric. It is a more versatile option that works well with a wider range of collar styles and tie fabrics, particularly thinner ties.
What type of tie fabric is best for a Windsor knot?
The Windsor knot works best with ties made from thinner to medium-weight fabrics. Thicker fabrics, such as wool or cashmere, can create an excessively large and bulky knot. Silk, linen, and lightweight wool blends are ideal choices for a Windsor knot, as they allow the knot to maintain its shape without being overly bulky.
How do I create a dimple in my Windsor knot?
To create a dimple, gently pinch the tie in the center just below the knot, using your thumb and forefinger to create a distinct crease. Hold the dimple in place as you tighten the knot, ensuring the crease remains intact. You can also use a dimple clip to help hold the dimple in place while you tie the knot. Practice and experimentation are key to mastering the art of the dimple.
Is the Windsor knot suitable for all collar types?
The Windsor knot is best suited for spread collars, cutaway collars, and wide-spread collars, as these collar styles provide ample space for the knot to sit comfortably and symmetrically. It may not be suitable for point collars or button-down collars, as these narrower collar styles may not have enough space to accommodate the larger Windsor knot. The Half Windsor knot is a more versatile option that works well with a wider range of collar styles.
How long should my tie be after tying a Windsor knot?
The tip of your tie should ideally reach your belt buckle or slightly overlap it. Adjust the starting length of the wide end of your tie based on your height and the thickness of your tie to achieve the proper length after tying the Windsor knot. Taller individuals may require longer ties to ensure the tip reaches the belt buckle.


