The art of tying a bow with a tie is a skill that transcends mere formality. It’s a statement of intent, a subtle declaration of style, and a practical technique that can transform a simple accessory into a striking focal point. In a world where first impressions are crucial, and where personal presentation speaks volumes, mastering this seemingly simple knot can offer a significant advantage. From the boardroom to a formal social event, the ability to tie a perfect bow tie from a regular tie adds a touch of sophistication and individuality that sets you apart. It’s a skill that blends the classic with the contemporary, offering a unique twist on traditional menswear.
The relevance of this skill remains high in today’s fashion landscape. While pre-tied bow ties are readily available, they often lack the character and personalized touch that comes from tying your own. The act of tying a bow with a tie allows for customization in terms of the size, shape, and overall aesthetic of the bow. This level of control is unattainable with pre-tied options. Furthermore, it’s a skill that empowers you to be resourceful, allowing you to adapt to various situations and fashion preferences. It’s about embracing a timeless tradition with a modern sensibility.

The current context is particularly interesting. With a resurgence of interest in classic menswear and a growing appreciation for craftsmanship, the ability to tie a bow tie from a regular tie is becoming increasingly sought after. Social media platforms are filled with tutorials and style inspiration, highlighting the versatility and appeal of this technique. Moreover, the rise of sustainable fashion and a desire to minimize waste encourage repurposing existing items. Tying a bow tie from a regular tie is a perfect example of upcycling, allowing you to breathe new life into your wardrobe. This skill also appeals to those who want to express themselves in unique ways, to step away from mass-produced fashion and create something individual and tailored to their tastes.
This comprehensive guide will delve into the intricacies of tying a bow tie from a regular tie, offering step-by-step instructions, expert tips, and valuable insights to help you master this essential skill. Whether you’re a seasoned fashion enthusiast or a complete novice, this article will equip you with the knowledge and confidence to tie a perfect bow tie and elevate your style.
Understanding the Fundamentals: The Anatomy of a Bow Tie and Essential Tools
Before diving into the step-by-step instructions, it’s crucial to understand the anatomy of a bow tie and gather the necessary tools. This foundational knowledge will streamline the learning process and ensure a successful outcome. Think of it as the blueprint for your creation; understanding the components is key to assembling the finished product. This section will cover the essential elements and provide a solid basis for your journey into the art of tying a bow tie.
The Key Components of a Bow Tie
A bow tie, regardless of how it’s created, is comprised of distinct parts that contribute to its overall form and appearance. Familiarizing yourself with these components will make the tying process more intuitive. Recognizing these parts helps with understanding the different steps.
The Wings
The “wings” are the most visually prominent parts of the bow tie. These are the two loops that form the characteristic shape. The size and shape of the wings determine the overall style and personality of the bow tie. A well-proportioned wing size is crucial for a balanced and aesthetically pleasing bow tie. Different wing shapes, such as butterfly, batwing, or diamond-point, can be achieved depending on the tying technique and the type of tie used. Consider the wings as the face of the bow tie.
The Knot
The knot is the central point where the wings converge. It’s the heart of the bow tie, holding everything together. The knot’s size and tightness influence the bow tie’s overall structure. A well-formed knot should be neat and symmetrical, contributing to the overall elegance of the bow tie. The knot can be manipulated slightly to adjust the bow tie’s appearance.
The Neckband
The neckband is the portion of the tie that goes around the neck. The length of the neckband needs to be properly adjusted for comfort and aesthetics. The adjustment mechanism is often hidden within the knot or at the back of the bow tie. This part is critical for ensuring a comfortable fit and a secure hold throughout the day or evening. Ensuring the right length is key.
Essential Tools and Materials
While you don’t need a lot of equipment to tie a bow tie from a regular tie, having the right tools on hand will make the process much smoother and more enjoyable. Gathering these items beforehand will prevent any frustrating interruptions and ensure you’re fully prepared. Preparation is key to success.
The Tie
Obviously, you need a tie! Choose a tie that is of a suitable length and width. A tie made of silk or other natural fibers generally works best, as it will hold the knot and shape better. The texture of the tie will also influence the final appearance of the bow tie. Avoid ties that are overly thick or stiff, as they can be difficult to manipulate. A standard-length tie is usually sufficient, but a longer tie might be required depending on your neck size and desired bow tie size. The tie’s pattern and color are also very important.
A Mirror
A full-length mirror is crucial for seeing the knot and the overall bow tie from multiple angles. You’ll need to be able to see what you’re doing, and a mirror helps you keep track of the process. You need to make sure the knot is even and that the wings are symmetrical. This is an essential tool for checking the proportions. A hand mirror can also be helpful for fine-tuning the bow tie’s shape.
Optional: A Measuring Tape
While not strictly necessary, a measuring tape can be useful for ensuring the bow tie is the correct length. Measuring your neck circumference before you start tying can help you estimate the required length of the neckband. This will give you a more precise outcome. This is an added step that gives a tailored feel to the process.
Optional: A Safety Pin
A safety pin can be helpful for temporarily securing the bow tie in place while you adjust the knot and wings. It can be used to hold the knot together before you tighten it. This is especially useful if you’re new to the process or working with a slippery tie material. Just remember to remove it once the knot is secured. This is a very helpful technique for beginners.
Step-by-Step Guide: Tying a Bow Tie with a Tie
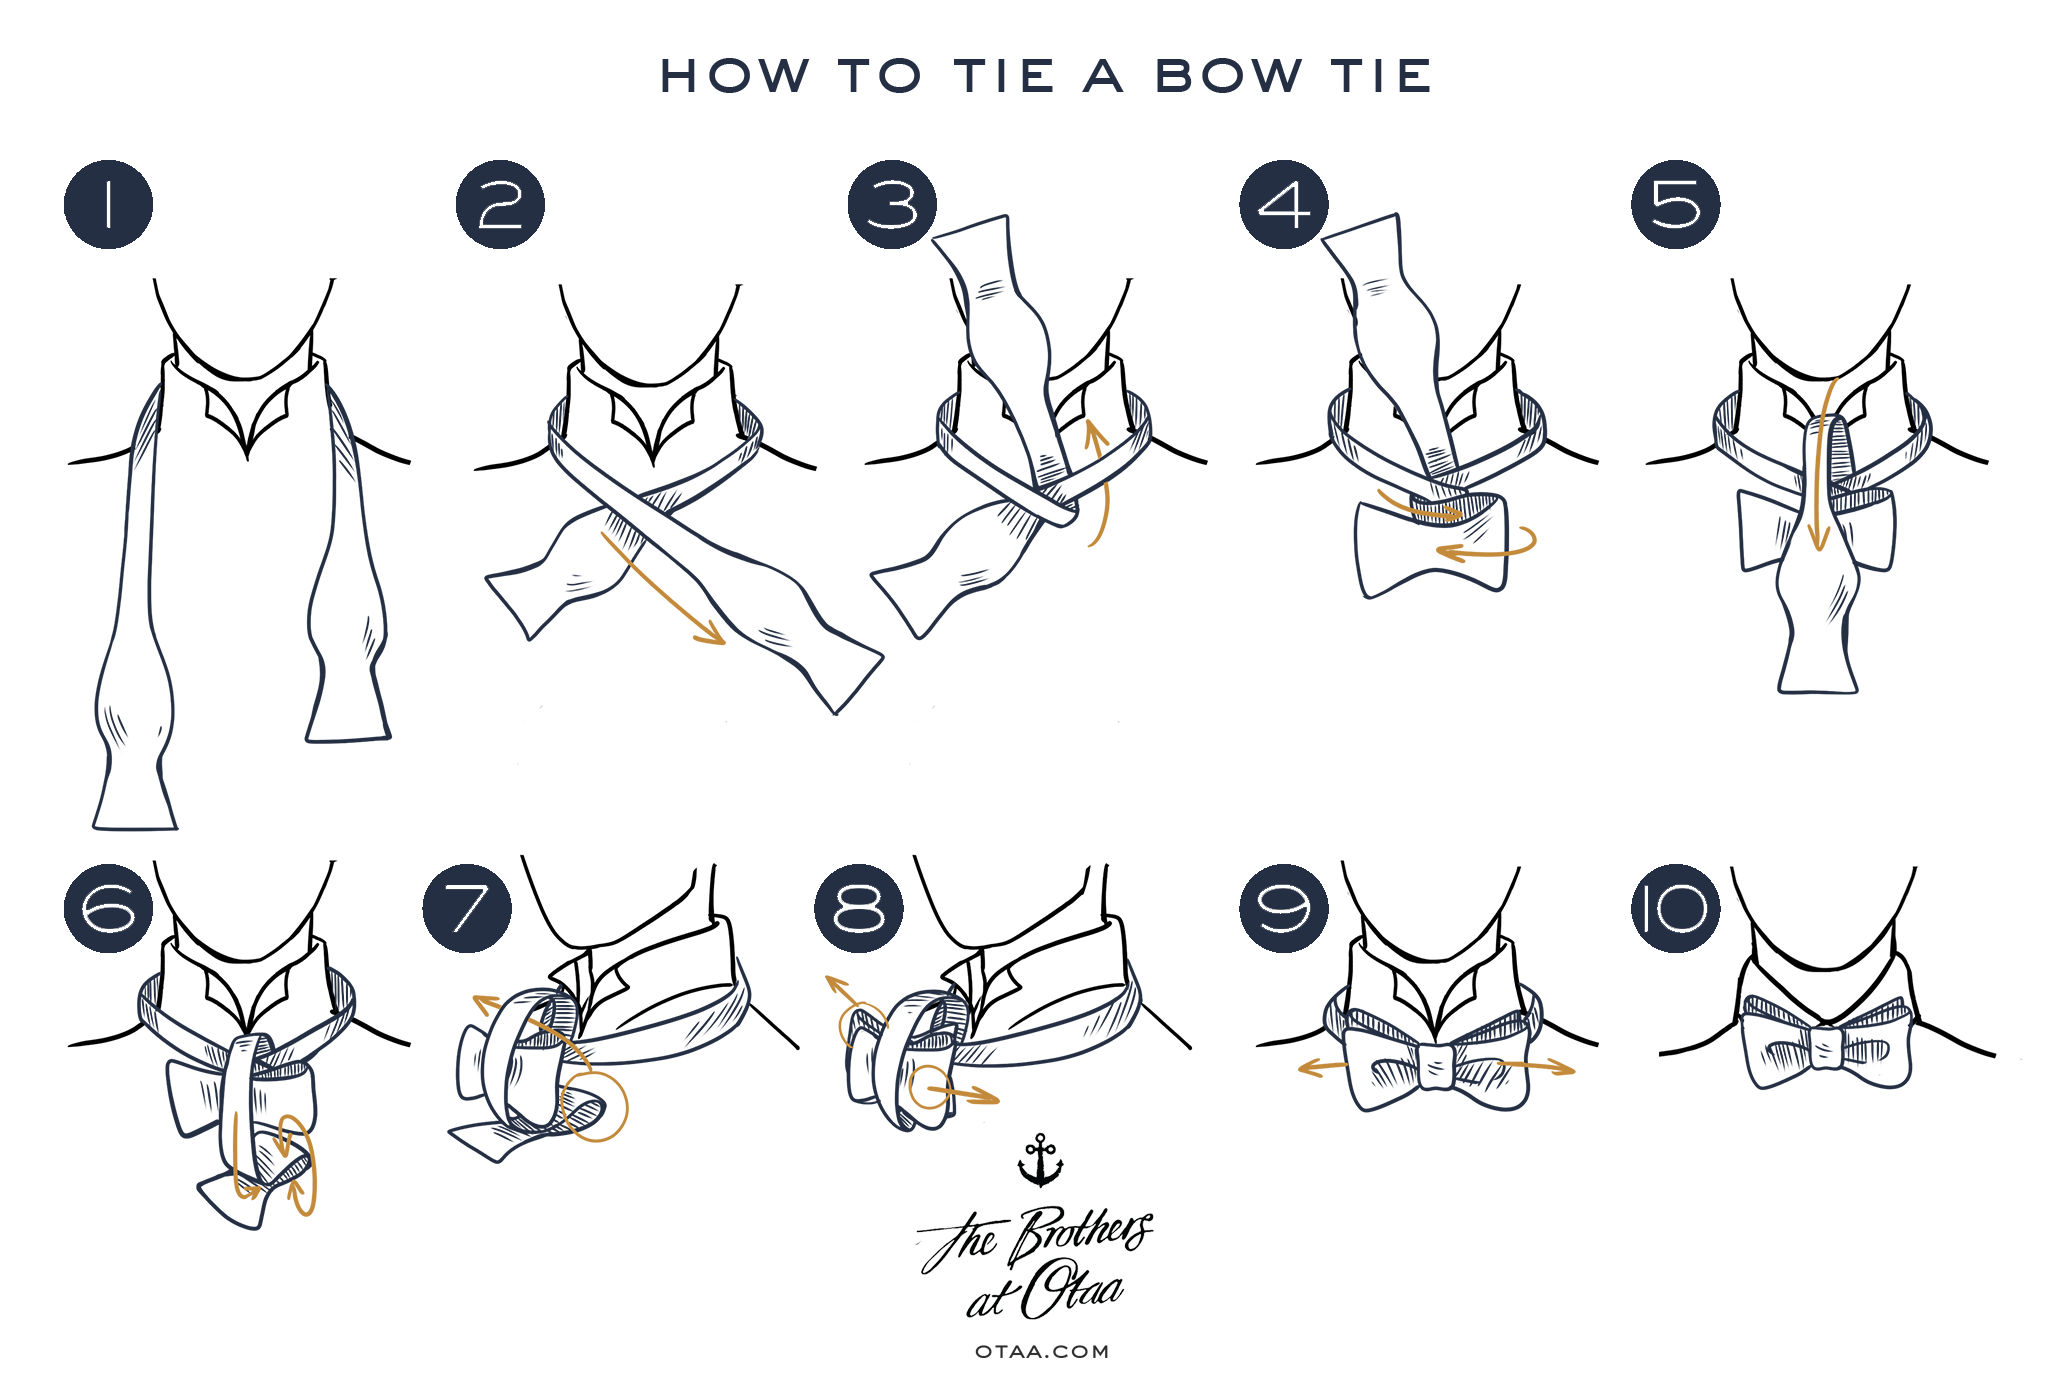
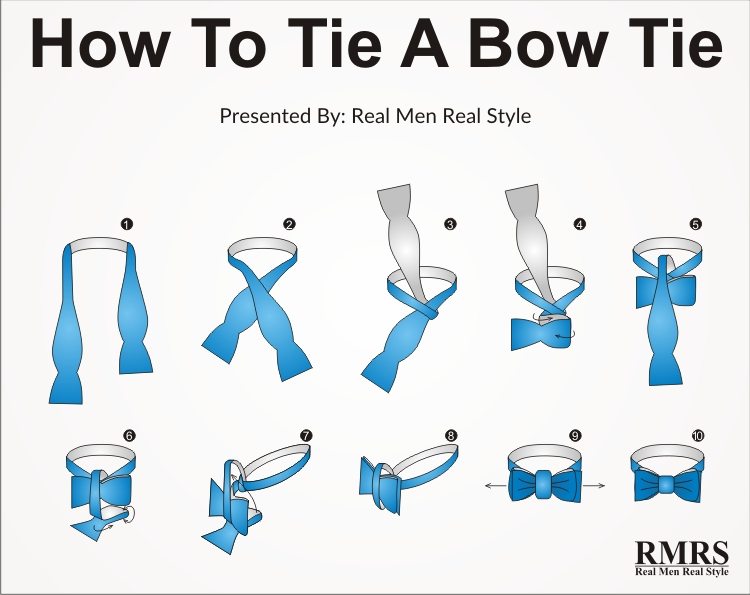
Now that you understand the basics, let’s get into the core of the matter: the step-by-step instructions for tying a bow tie from a regular tie. This section will provide a detailed, easy-to-follow guide, breaking down the process into manageable steps. Practice makes perfect, so don’t be discouraged if it takes a few tries to get it right. Persistence and attention to detail are key to mastering this skill.
Step 1: The Initial Setup
Before you begin, make sure you have a clear workspace and good lighting. Drape the tie around your neck, with the wide end on your right and extending lower than the narrow end. The exact length difference will depend on your neck size and the desired size of your bow tie, but a good starting point is to have the wide end extend about a foot or more below the narrow end. This initial setup is crucial for getting the right proportions. Position yourself in front of a mirror so you can see your work. This allows you to see the knot and wing formation.
Step 2: Crossing and Forming the Knot
Cross the wide end of the tie over the narrow end, just below your chin. Then, bring the wide end up and behind the narrow end, passing it through the loop around your neck. This creates the basic knot structure. Pull the wide end down firmly, and adjust the knot so it sits comfortably against your collar. This is the foundation of the bow tie. This step sets up the structure for the bow tie. The first crossing is the most important.
Step 3: Forming the Bow
Drape the wide end of the tie over your shoulder. Then, bring the wide end down, and fold it into a bow shape, keeping the fold relatively even. This will be one of the wings of your bow tie. Pinch the folded bow in the middle. Now, bring the narrow end of the tie down and over the center of the bow. This will create the second wing. You’ll now be working with the bow’s form.
Step 4: Creating the Knot and the Wings
Fold the narrow end of the tie horizontally, creating a loop that will become the second wing of the bow tie. Pass this folded end behind the knot, and then bring it through the loop that was created around your neck. This is the most intricate part, but essential to the final look. This is where the knot is really formed. The wings are made at this stage.
Step 5: Tightening and Shaping
Gently pull on the loops of the bow tie to tighten the knot. Adjust the wings to create the desired shape and size. Be sure that the wings are symmetrical. The tension on the knot determines the bow tie’s tightness. Once you have the wings shaped the way you like, and the knot is secure, you’ve successfully tied a bow tie! This is where the beauty and style appear. Fine-tuning the shape is the final step.
Step 6: Final Adjustments
Once you have the basic bow tie tied, take a moment to make final adjustments. Ensure the knot is centered and secure, and that the wings are symmetrical. The shape of the wings can be adjusted by gently pulling on them. You can also adjust the length of the neckband by pulling on the loose ends of the tie at the back of your neck. This step allows for refinement. This is where you perfect the style and fit.
Advanced Techniques and Variations
Once you’ve mastered the basic technique, you can explore advanced techniques and variations to further refine your bow tie tying skills. This section will explore ways to customize your bow ties, including different wing shapes, knot styles, and tie materials. This expansion allows you to elevate your creations to a more personal level.
Variations in Wing Shape
The shape of the wings is a key element of a bow tie’s style. Experimenting with different wing shapes can dramatically alter the appearance of the bow tie. Here are some common variations:
Butterfly Bow Tie
The butterfly bow tie is the classic shape, characterized by its wide, symmetrical wings. This shape is versatile and suitable for various occasions. It’s the most common style, and it’s a great starting point. This is a classic and adaptable shape.
Batwing Bow Tie
The batwing bow tie has a narrower, more streamlined shape. This style is often considered more modern and edgy. It’s a bolder, more modern look. This is a contemporary and stylish option.
Diamond-Point Bow Tie
The diamond-point bow tie features pointed wings, adding a touch of sophistication and flair. This is a more formal style. This adds a touch of formality and elegance. This creates a unique and stylish impression.
Knot Variations
While the standard knot is the most common, there are variations you can experiment with to change the bow tie’s look. These variations may require some practice. Experimentation is key to expanding your skills.
The Single Knot
This knot is a simpler variation, resulting in a less bulky knot. This is a great option for lightweight ties. This can create a more streamlined look. It’s a good alternative for lighter fabrics.
The Double Knot
The double knot creates a more complex and substantial knot. This is a more formal style. This knot can add more depth and visual interest. It’s ideal for a more formal look.
Material Matters: The Impact of Tie Fabric
The material of the tie significantly impacts the final result. Different fabrics will react differently to the tying process, affecting the shape, texture, and overall look of the bow tie. Experimenting with different fabrics is essential for achieving various styles.
Silk Ties
Silk ties are a popular choice due to their luxurious feel and ability to hold a knot well. Silk drapes beautifully and is often the choice for formal events. This is a classic and elegant option. Silk offers a refined look and feel.
Wool Ties
Wool ties provide a more textured and casual look. Wool ties are great for fall and winter. Wool ties are a great option for casual settings. Wool provides a more textured look.
Cotton Ties
Cotton ties are versatile and can be dressed up or down. Cotton is a breathable fabric and is easy to care for. Cotton is a good choice for warmer weather. Cotton is a versatile and accessible option.
Troubleshooting Common Problems
Even with the best instructions, you may encounter some challenges when learning to tie a bow tie. This section addresses common problems and provides solutions to help you overcome them. Don’t be discouraged by setbacks; they’re a part of the learning process. Persistence and practice will eventually lead to mastery.
The Knot is Too Loose
If the knot is too loose, try tightening it by gently pulling on the loops and the ends of the tie. Make sure that the knot is secure before you begin shaping the wings. The knot needs to be tight enough to hold its shape. Adjusting the tension will give you the desired result. Tighten the knot to create the correct tension.
The Wings Are Asymmetrical
If the wings are asymmetrical, gently adjust them by pulling on the loops until they are balanced. Use a mirror to compare the size and shape of the wings. Symmetry is key for a polished look. This requires patience and practice. Focus on the balance and symmetry of the wings.
The Neckband is Too Long or Too Short
If the neckband is too long or too short, adjust the length by sliding the knot up or down. You can also adjust the neckband by adjusting how much of the tie you pull through the loop in Step 2. This takes practice and a good sense of proportion. Practice this step to perfect the fit. Fine-tuning the neckband is key to a comfortable fit.
The Tie Material is Slippery
If the tie material is slippery, it may be difficult to keep the knot and wings in place. Try using a tie with a textured surface or a tie made of a fabric that grips better. A safety pin can also be used to temporarily secure the knot and wings while you adjust them. The tie’s texture can affect the outcome. Choose the right fabric for the task. Using safety pins can help with slippery materials.
Real-World Applications and Benefits
The ability to tie a bow tie with a tie is more than just a stylish skill; it has practical applications and offers several benefits. This section will explore the real-world advantages of mastering this technique, from professional settings to social occasions. It’s a skill that can elevate your personal brand and enhance your confidence.
Professional Settings
In professional settings, a well-tied bow tie can make a powerful statement. It signals attention to detail, a sense of style, and a willingness to stand out. It can be especially effective in creative industries, such as design or marketing, where a touch of individuality is valued. It shows attention to detail. A bow tie can make a statement in professional settings. It can enhance your personal brand.
Formal Events
At formal events, a bow tie is a classic choice. Tying your own allows you to control the style and fit, ensuring a polished and personalized look. It’s a timeless choice for formal events. It allows for custom styling. It ensures a polished and personalized look.
Social Occasions
A bow tie can add a touch of sophistication and flair to various social occasions, from cocktail parties to weddings. It’s a conversation starter and a way to express your personal style. It’s a great way to express your personal style. It is a conversation starter. It adds sophistication to social occasions.
Confidence and Self-Expression
Learning to tie a bow tie boosts your confidence by equipping you with a unique skill. It also allows for self-expression and a way to make a statement. It provides a way to stand out. It gives a boost of confidence. It fosters self-expression and individuality.
Summary and Recap
Mastering the art of tying a bow tie from a regular tie is a rewarding skill that combines classic elegance with modern adaptability. This guide has provided a comprehensive overview, from understanding the fundamental components and gathering the necessary tools to mastering the step-by-step instructions and exploring advanced techniques.
We began by emphasizing the importance and relevance of this skill in today’s fashion landscape. The ability to tie your own bow tie allows for personalization, resourcefulness, and a unique expression of style. This skill is an excellent example of embracing timeless tradition with a modern sensibility. The ability to tie a bow tie is a valuable skill.
We then delved into the fundamentals, covering the anatomy of a bow tie, including the wings, the knot, and the neckband. Understanding these components is crucial for achieving the desired result. We also discussed the essential tools, including the tie itself, a mirror, and optional items like a measuring tape and safety pin. Understanding the components is key.
The step-by-step guide provided a clear, concise process, breaking down the tying technique into manageable steps. Remember to start with the initial setup, crossing and forming the knot, forming the bow, creating the knot and the wings, tightening and shaping, and making final adjustments. Practicing these steps consistently is the key to success. Practice and repetition are key to mastering the technique.
We also explored advanced techniques and variations, including different wing shapes (butterfly, batwing, diamond-point), knot variations (single knot, double knot), and the impact of tie material (silk, wool, cotton). Experimenting with these variations allows for greater customization and personal expression. Different fabrics and styles are possible.
Troubleshooting common problems, such as a loose knot, asymmetrical wings, or a neckband that’s too long or too short, was also covered. Addressing these issues allows for more effective troubleshooting. Practice and adjustments are part of the process.
Finally, we highlighted the real-world applications and benefits of this skill, including its value in professional settings, formal events, social occasions, and its impact on confidence and self-expression. The benefits are numerous. Tying a bow tie is a valuable skill.
Frequently Asked Questions (FAQs)
What type of tie is best for tying a bow tie?
A tie made of silk or other natural fibers, with a standard length and a moderate width, is generally best. The fabric should be able to hold the knot and shape well, and the tie should not be too thick or stiff.
How long does it take to learn to tie a bow tie?
The learning curve varies depending on individual dexterity and practice. It might take several attempts to perfect the technique. Consistency and patience are essential. With practice, most people can learn to tie a bow tie within a few days or weeks.
What if the bow tie looks uneven?
If the bow tie looks uneven, gently adjust the wings by pulling on the loops until they are symmetrical. A mirror is essential for visual comparison. Practice and adjusting the wings will result in a more balanced look.
Can I use a pre-tied bow tie as a guide?
Yes, you can use a pre-tied bow tie as a visual guide to understand the shape and construction. However, the tying process is different, so you’ll still need to learn the steps. This will help you to visualize the final product.
What if I don’t have a tie long enough?
If you have a shorter tie, you may still be able to tie a bow tie, but the bow tie will be smaller. You might need to experiment with different techniques. You could also consider using a tie extender or buying a longer tie. Choose a tie that is the right length.


