In a world increasingly dominated by casual dress codes and digital interactions, the art of tying a necktie might seem like a relic of a bygone era. Yet, the humble tie continues to hold a powerful, enduring significance in both professional and personal spheres. It is more than just a piece of fabric; it is a statement of intent, a mark of respect, and a subtle nod to tradition and personal grooming. Whether you’re preparing for a crucial job interview, attending a formal wedding, or simply aiming to elevate your daily business attire, a well-tied knot can dramatically enhance your overall presentation, conveying confidence, attention to detail, and a polished demeanor.
The vast universe of necktie knots offers a fascinating array of choices, each with its own character, size, and level of formality. From the slender, asymmetrical Four-in-Hand, perfect for a relaxed yet refined look, to the grand, symmetrical Full Windsor, reserved for the most formal occasions, there’s a knot to suit every collar, fabric, and personal preference. However, amidst this diverse selection, one knot stands out for its exceptional versatility, balanced aesthetics, and relative ease of mastery: the Half Windsor. It strikes a perfect equilibrium, offering a knot that is substantial enough to make an impact without being overly bulky, symmetrical enough to convey formality without stiffness, and elegant enough for a wide range of settings.

The Half Windsor has cemented its place as a go-to knot for countless individuals worldwide, bridging the gap between casual ease and formal gravitas. Its enduring popularity is a testament to its adaptability and the clean, sophisticated silhouette it creates. In today’s hybrid work environments, where the line between professional and casual often blurs, mastering a knot like the Half Windsor becomes an invaluable skill. It allows you to project an image of professionalism and competence, whether you’re in a virtual meeting or back in the office. This comprehensive guide will demystify the process of tying a Half Windsor, offering clear, step-by-step instructions, practical tips, and insights into why this particular knot remains a cornerstone of classic menswear. By the end, you’ll not only be able to tie a perfect Half Windsor but also understand its nuances and how to integrate it seamlessly into your wardrobe, ensuring you always present your best self.
Understanding the Half Windsor: A Knot for All Occasions
The Half Windsor knot occupies a unique and highly valued position in the lexicon of necktie knots. It’s often lauded as the perfect compromise, offering a knot that is both substantial and refined, without the excessive bulk of its namesake, the Full Windsor. To truly appreciate its utility and elegance, it’s essential to delve into what makes this knot so distinctive and why it has become a staple for discerning individuals across various professional and social landscapes.
What Makes the Half Windsor Unique?
At its core, the Half Windsor is characterized by its symmetrical, triangular shape. Unlike the asymmetrical taper of the Four-in-Hand, the Half Windsor presents a balanced and neat appearance that sits squarely beneath the collar. Its medium size is another key attribute. It’s larger and more formal than the Four-in-Hand, yet significantly less voluminous than the Full Windsor. This intermediate size makes it incredibly adaptable, suitable for a vast array of shirt collar types, from the classic point collar to the more contemporary semi-spread and even some full spread collars. The knot’s structure also allows it to drape beautifully with various tie fabrics, whether it’s a sleek silk, a textured wool, or a crisp cotton.
Historical Context and Evolution
The story of the Half Windsor is inextricably linked to the Full Windsor, a knot famously associated with the Duke of Windsor, later King Edward VIII. While the Duke himself preferred a thicker tie material to achieve a large knot, the Windsor knot as we know it today was developed by others to emulate his desired aesthetic using standard ties. The Full Windsor, with its double wrap, creates a very large and formal knot. Recognizing the need for a knot that offered similar symmetry and elegance but with less bulk, the Half Windsor emerged as a refined and more accessible version. It retains the clean lines and balanced look of the Full Windsor but uses less fabric and is quicker to tie, making it a popular choice for daily business wear and semi-formal events alike. Its rise in popularity reflects a desire for a polished look that doesn’t feel overly stiff or cumbersome.
Comparing the Half Windsor to Other Popular Knots
Understanding the Half Windsor’s place in the tie knot hierarchy is best achieved through a comparison with its most common counterparts:
Half Windsor vs. Four-in-Hand
The Four-in-Hand is perhaps the most common and oldest knot. It’s asymmetrical, relatively small, and has a more casual, relaxed appearance. It’s quick to tie and uses the least amount of tie fabric, making it suitable for thicker ties or when you prefer a less formal look. In contrast, the Half Windsor is larger, perfectly symmetrical, and conveys a greater sense of professionalism and formality. While the Four-in-Hand is ideal for narrow collars and everyday casual business, the Half Windsor elevates the look, making it suitable for more important meetings or events.
Half Windsor vs. Full Windsor
The Full Windsor is the largest and most formal of the common knots. It requires more tie fabric and creates a voluminous, perfectly symmetrical triangle. It is often reserved for very formal occasions, such as black-tie events (when wearing a regular tie, not a bow tie) or high-stakes business presentations, particularly with wide-spread collars. The Half Windsor offers a similar symmetrical appeal but in a medium size. It uses less fabric, making it more comfortable and versatile for daily wear. It’s the go-to choice when you want a strong, symmetrical knot that isn’t overwhelmingly large. For many, the Half Windsor strikes the ideal balance, offering the formality and neatness of the Full Windsor without its sometimes imposing size.
To further illustrate these differences, consider the following table:
| Knot Type | Symmetry | Size | Formality | Best For |
|---|---|---|---|---|
| Four-in-Hand | Asymmetrical | Small | Casual/Business Casual | Narrow collars, thicker ties, everyday wear |
| Half Windsor | Symmetrical | Medium | Business/Semi-Formal | Most collar types, standard ties, versatile occasions |
| Full Windsor | Symmetrical | Large | Formal | Wide spread collars, thin ties, very formal events |
Why Choose the Half Windsor? Practical Benefits
The choice of the Half Windsor is often driven by its immense practicality and aesthetic advantages. Its versatility across occasions means it can seamlessly transition from a crucial job interview to a formal dinner. It projects an image of elegance without being overly ostentatious, striking the right chord in most professional and social settings. For those new to tying knots beyond the basic Four-in-Hand, the Half Windsor is relatively easy to master, requiring only a few more steps but yielding a significantly more polished result. Ultimately, it helps you create a clean, professional look that conveys attention to detail and a sophisticated understanding of personal presentation. This balance of ease, elegance, and adaptability makes the Half Windsor an indispensable knot in any well-dressed individual’s repertoire.
Mastering the Half Windsor: A Step-by-Step Visual Guide
Tying a Half Windsor might seem daunting at first glance, but with a clear understanding of each step and a bit of practice, it quickly becomes second nature. The key is precision and consistency. This section breaks down the process into easily digestible steps, guiding you from the initial drape to the final adjustment, ensuring a perfectly formed knot every time. Remember, the goal is not just to tie a knot, but to tie a neat, symmetrical, and well-proportioned one that complements your shirt and overall attire.
Preparation is Key: Setting Up for Success
Before you even begin the knotting process, a few preparatory steps can significantly impact the outcome:
- Choose the Right Tie Length: When fully tied, the tip of your tie should ideally reach the middle of your belt buckle. If your tie is particularly long or short, you might need to adjust the starting position of the wide end accordingly. The Half Windsor uses a moderate amount of tie fabric, more than a Four-in-Hand but less than a Full Windsor.
- Collar Up, Top Button Fastened: Always start with your shirt collar popped up and the top button of your shirt securely fastened. This provides a stable base for tying and ensures the knot will sit snugly against your neck once completed.
- Ensure the Tie is Smooth: Run your hands down the tie to ensure there are no twists or creases. A smooth tie will result in a cleaner, more refined knot.
The Tying Process: Detailed Steps
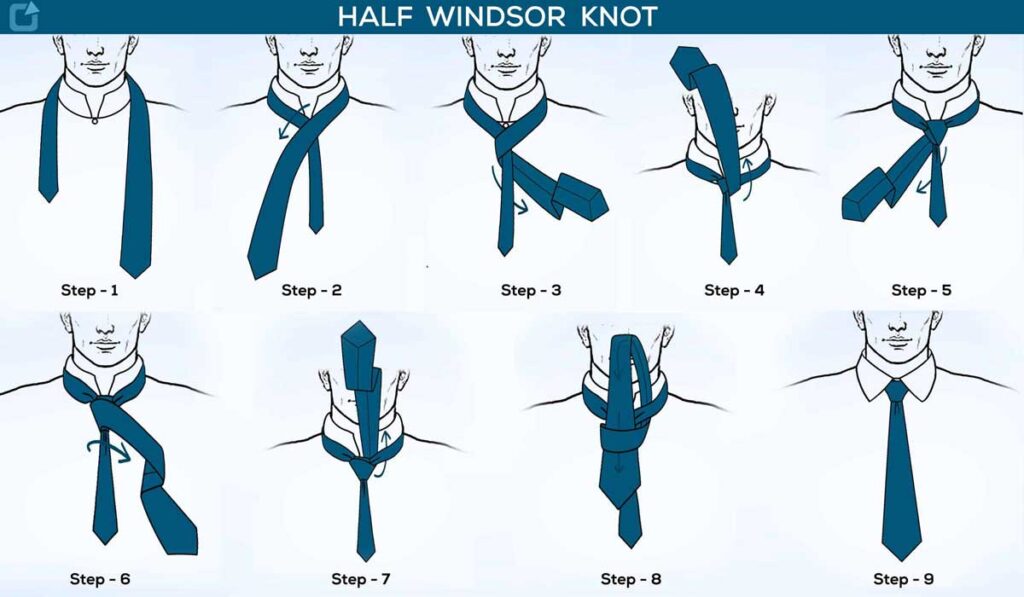
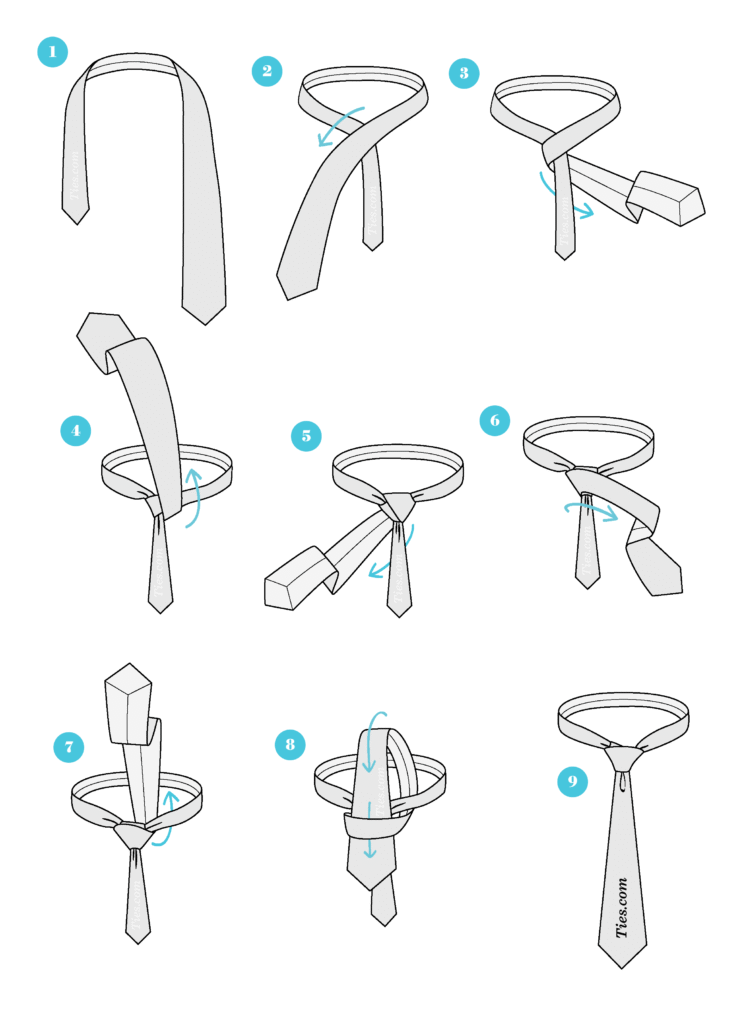
Now, let’s dive into the core mechanics of tying the Half Windsor. Imagine you are looking in a mirror:
Step 1: Initial Drape
Drape the tie around your neck. Position the wide end on your right side and the narrow end on your left. The wide end should hang approximately 12 to 18 inches lower than the narrow end. This initial length adjustment is crucial for achieving the correct final length.
Step 2: Cross Over
Take the wide end and bring it across the front of the narrow end, moving from your right to your left. The wide end should now be on your left side.
Step 3: Up Through the Neck Loop (First Pass)
Bring the wide end up through the loop that formed around your neck, coming from underneath. Pull it all the way through, bringing it out over the top of the loop. The wide end should now be pointing upwards.
Step 4: Down and Behind
Pull the wide end down and then behind the narrow end, moving from your left to your right. This creates a small loop on the left side of what will become the knot.
Step 5: Up Through the Neck Loop (Second Pass)
Bring the wide end up through the loop around your neck again, this time from underneath, and through the opening you just created. This forms the foundational shape of the Half Windsor knot. The wide end should again be pointing upwards.
Step 6: Down Through the Front Loop
Now, pull the wide end down through the loop that formed in the front of the knot. This is the final pass that locks the knot into place. Gently guide the wide end downwards, ensuring it lies flat and smooth.
Step 7: Tighten and Adjust
Hold the narrow end of the tie firmly with one hand. With the other hand, gently slide the knot up towards your neck. As you slide, pull the wide end downwards to tighten the knot. Ensure the knot is symmetrical and sits snugly against your collar, without being too tight or too loose. Make any minor adjustments to achieve the desired shape and a clean, triangular appearance. This is also the stage where you can create a dimple if desired.
Tips for a Perfect Knot Every Time
- Practice Makes Perfect: Like any skill, tying a Half Windsor improves with repetition. Don’t get discouraged if your first few attempts aren’t flawless.
- Adjusting Length: If your tie ends up too long, start with the wide end a little higher in Step 1. If it’s too short, start with the wide end lower.
- The Importance of the Dimple: A dimple is a small indentation just below the knot, adding depth and a touch of sartorial flair. To create it, gently pinch the tie fabric just below the knot with your thumb and forefinger as you tighten the knot in Step 7.
- Avoid


