In a world increasingly focused on efficiency and speed, the seemingly simple act of tying a necktie remains a surprisingly nuanced art form. The Half Windsor knot, a classic choice for formal occasions, sits comfortably between the more casual Four-in-Hand and the more intricate Full Windsor. Understanding its intricacies, beyond just the steps involved, reveals a fascinating interplay of aesthetics, practicality, and even a touch of social history. From business meetings to weddings, the Half Windsor knot offers a subtle yet powerful statement, showcasing an attention to detail and a refined sense of style. This post delves into the precise mechanics of tying a Half Windsor, exploring its history, variations, and the nuances that elevate it from a mere knot to a sartorial statement. Learning to tie it correctly not only enhances personal presentation but also reveals a deeper appreciation for the artistry behind everyday attire.
Understanding the Half Windsor Knot
The Half Windsor knot, distinguished by its symmetrical shape and balanced proportions, is a popular choice for formal events. Its relatively compact size makes it a suitable option for most neckties, and its structure allows for a comfortable and secure fit. It’s versatile enough to be worn with various shirt collars and suits, making it a go-to knot for many.

Historical Context and Evolution
The evolution of necktie knots mirrors broader societal shifts in fashion and formality. The Half Windsor, like its predecessors, reflects a desire for both aesthetic appeal and practical function. Its design, though seemingly simple, is the result of centuries of refinement and adaptation to changing trends.
The Rise of Formal Dress Codes
Formal dress codes, particularly in business and social settings, played a significant role in the standardization of necktie knots. The Half Windsor, with its balanced elegance, became a favored choice, representing a level of refinement and attention to detail.
Key Characteristics of the Half Windsor
The Half Windsor is characterized by its symmetrical shape, distinct loops, and relatively compact size. This combination of features contributes to its overall elegance and practicality.
Visual Distinctions
Visually, the Half Windsor knot features two distinct loops that are roughly equal in size and shape. This balanced structure creates a symmetrical and refined appearance.
The Step-by-Step Guide to Tying a Half Windsor
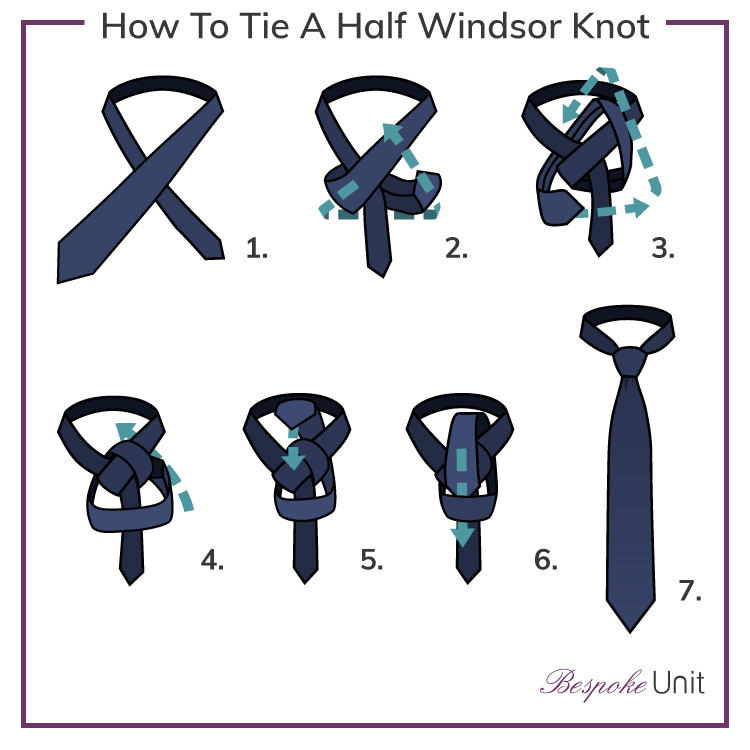
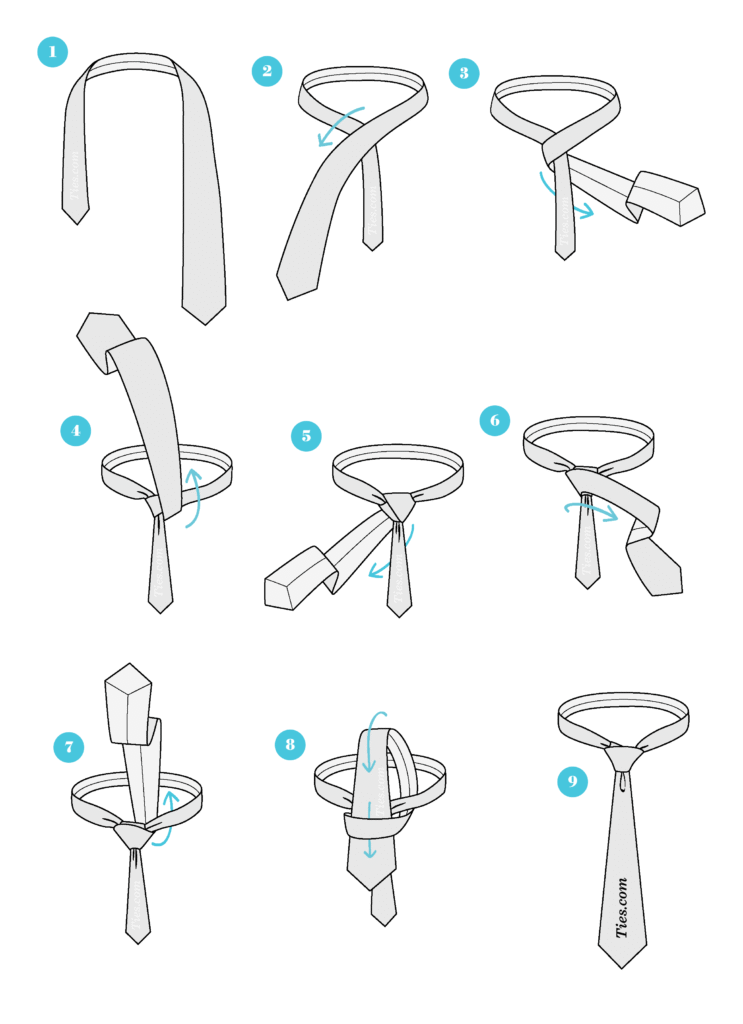
Tying a Half Windsor involves a sequence of precise movements, each contributing to the final, symmetrical shape. Patience and attention to detail are crucial for achieving the desired result.
Initial Steps and Preparation
Begin by holding the tie in your hands, ensuring the wider end is on top. The length of the tie should be appropriate for your shirt and neck size.
Holding the Tie Correctly
The wider end of the tie should be held in your right hand, and the narrower end in your left. This positioning is essential for creating the proper loops and twists.
Creating the First Loop
Cross the wider end of the tie over the narrower end, forming a loop. Ensure the loop is centered and balanced.
The Second Loop and Twist
Cross the narrower end of the tie under the wider end, creating a second loop. Ensure both loops are consistent in size.
Important Considerations
A critical part of the Half Windsor is ensuring the two loops are of approximately the same size. This will ensure symmetry and an aesthetically pleasing knot.
Variations and Considerations
While the basic Half Windsor knot provides a solid foundation, variations and considerations exist to cater to individual preferences and styles.
Adjusting for Different Necktie Widths
The size and width of the necktie can influence the tightness and shape of the knot. Adjust the steps to accommodate the width of the tie for optimal results.
The Role of Practice
Becoming proficient in tying the Half Windsor requires practice. The more you practice, the more comfortable and confident you’ll become with the process.
Potential Challenges and Troubleshooting
While relatively straightforward, the Half Windsor knot can present some challenges for beginners.
Common Mistakes and How to Avoid Them
One common mistake is creating uneven loops. Careful attention to each step is crucial to avoid this issue. Another common problem is the knot being too loose or too tight.
Tips for Overcoming Challenges
Take your time, and focus on the symmetry of the loops. If you’re struggling, consider watching a video tutorial or seeking guidance from someone experienced.
Practical Applications and Real-World Examples
The Half Windsor knot finds its place in a variety of contexts, from business meetings to formal dinners.
Formal Settings
The Half Windsor’s elegance makes it suitable for weddings, corporate events, and other formal gatherings.
Informal Settings
While typically associated with formal wear, the Half Windsor can also work well in semi-formal settings, depending on the specific occasion.
Summary
The Half Windsor knot, a versatile and elegant choice, offers a balance between formality and practicality. Its symmetrical structure makes it suitable for various occasions, from business meetings to social events. Proper technique is crucial for achieving a well-tied, aesthetically pleasing knot. Understanding the steps involved, from preparation to the final adjustment, ensures a polished appearance.
Mastering the Half Windsor knot involves attention to detail and a bit of practice. This article provided a comprehensive guide, covering its history, variations, potential challenges, and practical applications. By following the steps outlined, readers can enhance their personal style and effortlessly achieve a well-tied Half Windsor knot.
Frequently Asked Questions (FAQs)
What are the key differences between the Half Windsor and the Full Windsor?
The Full Windsor knot is larger and more complex than the Half Windsor. The Half Windsor’s compact size makes it a suitable alternative for those who prefer a less voluminous knot. Both knots are formal, but the Full Windsor is typically considered slightly more formal.
How can I ensure the loops are symmetrical?
Maintaining symmetry is key to a well-tied Half Windsor. Focus on creating consistent loops during each step. Visualize the desired shape and ensure both loops are of approximately equal size and shape throughout the tying process. Practice makes perfect!
What is the best way to practice tying the Half Windsor knot?
Practice is essential for mastering any knot. Use a necktie and practice the steps repeatedly. Pay close attention to the formation of each loop and the overall symmetry of the knot. Use mirrors or videos for visual feedback. You can also practice with a partner or mentor.
Can I use a different type of tie with the Half Windsor knot?
Generally, the Half Windsor knot is compatible with various tie types. However, the width of the tie may affect the tightness and shape of the knot. Adjust the steps as needed to accommodate the width of your tie.
How important is the length of the tie when tying a Half Windsor?
The length of the tie is important for achieving the correct balance and proportions in the knot. A tie that is too long can make the knot appear loose, while a tie that is too short can make the knot look cramped. Adjust the tie length according to your shirt and neck size.


